Apr 30, 2014

Simon Says Stamp Wednesday Challenge: Keep It Simple

Hey there! Good morning to you! 
Just stopping in real quick to share two cards with you. Over at the Simon Says Stamp Wednesday Challenge blog this weeks challenge is Keep It Simple.
Of course, you can't pass up a chance to participate in that baby. I have been trying my hand at keeping it simple and wanted to share.


The reason I have two cards is because it was SO simple! You can see here my first card:
 I used Simon Says Stamp Lots of Dots and some Memento Luxe inks (swoon!) to stamp my dot background. I used the Big You die cut to cut out the dots and then die cut a replacement in black. I then stamped my sentiment "hey" and voila! It's done!


But.... what to do with the YOU part I cut out?? Well, nothing better than to make it a card as well! So here is my second card. Easy Peasy...
 I just glued it down flat (cause we are keeping it simple here folks!) and stamped my sentiment with yet another Memento Luxe ink. These inks are AMAZING! I might never use dye inks again. I love the coverage and the vibrancy of them. I'm totally willing to sit around and wait for them to dry just to have the look. Simply lovely.
Ok, so thats all today. Super simple and in no time flat, you have two cards to send!  It's such a great challenge and I'm getting in just under the wire. (I think. That time change is a doosey for me to figure out!)
Just as a note: We are supposed to use Hero Arts today, and I had totally planned on that, but then I finally got my new stamps and had to use them! They are so fun!

ok. Gotta run the kids to playgroup. Have a smashing day!
love to you and yours
k


Apr 29, 2014

Celebrate Your Day

Here's a little something to start out your week. Hopefully right! A little fussy cutting and coloring and "pop-up dot-ing" to make you feel happy today.

I kind of love this card. In fact, it took me awhile to actually part with it. There are so many lovely layers in real life that I'm sad this picture doesn't do it justice. But I figured in the spirit of spring cleaning, I would dig it out and share it with you!

I still have a lot to learn as far as my Copic marker-ing skills are concerned. And of course, the photo is a little burned out so the colours are too. I am still trying to find the perfect photo taking set up. It's taking so long! Maybe if I stopped leaving my camera in taxies, I would have more time to spend taking photos ; )

Anyway, I'm looking forward to a new week hopefully doing some challenges and I have a few orders coming in too... I splurged on ink (and some stamps and some dies) last week, so I'm excited! So stay tuned for some new stuff.
And after I spent all my money, I realized that what I really need is paper! Eek! I'm kind of running out and its not like I can take a quick trip down to my LSS to pick more up. No way.  I need to have that kind of stuff shipped from the states, and well that takes some time and money which I just spent on ink! Oy!

Anyway, onward and upward. I hope you have a great week ahead for you. We've had some sick kids this weekend so hopefully things will start to pick up here soon.
Thanks for stopping by!

love to you and yours,
k

Apr 27, 2014

I quite Like you...A...Lot

I'm feeling my age today because of this title. Do you remember the movie Dumb and Dumber? Jim Carreys caracter would say, "I like you A LOT" in a funny way and I used to laugh about it with my friends. So here is my little alligator who likes you, A LOT!


I used the stitched heart outline from Simon Says Stamp Watts Up, the cute alligator is Paper Smooches and the sentiment is Wplus9. And I do like it A LOT!
I used some new ink colors (new for me) from Hero Arts and I do think I have found my new favourites!

Anyway. Just a quick hello to you this nice Sunday afternoon. Hope you are enjoying your day.
thanks for stopping by.
love to you,
k


Apr 26, 2014

Papertrey Ink April Blog Hop Challenge

I am so annoyed with myself! I had my card all ready to participate in Papertrey Inks blog hop this month and I MISSED IT!! Arrrrggggh!

I think I was on top of it last night but then missed the boat because maybe I was off on the time change? Well, regardless, it's totally annoying but I still had fun making my card, so I am going to share it here.

The challenge was to take inspiration from embroidery. So thanks to a Pinterest search I found this little beauty and knew it was meant for me. I took a picture of it on my phone thank goodness because when I went back to find the link and source it was gone (of course). So this is the only picture I have and I believe from looking at it, it is some Sashiko style embroidery? Please someone correct me if I'm wrong! I love the black on the burlap. It's just so beautiful!
And here is my take on it. I pulled out an oldie but a goodie PTI set: Guidelines and knew there would be something in it that would help me find the look I wanted. And I think I was right. What do you think?
I made this a 4.25 squared card. I cut the "Sashiko" piece down to 3x3 and matted it with some True Black card stock. I die cut a circle out of velum and then using the Around and About Sentiments I added the circle sentiment and then the heart. You know, that little itty bitty heart, I think is too small, but I lost the bigger one down my sink drain when I was cleaning it last year! GASP!

Honestly, I was (and still am) heart broken because I think it was the best designed heart I have every used. Not too chunky, and just the right size for most designs. I'm still so sad about it!
I opted to glue down my vellum using Glossy Accents that followed the circle under the sentiment so you can't see it. I was going to pop it up but I do like being able to see the design through it which is why I stuck it down. And that little heart helps showcased the design a bit more too. What do you think?

I'm sad to have missed all the chatter and fun from the blog hop, but I will be extra dutiful next month to pay attention! Can't wait to go back and browse all the entries and glean even more inspiration from everyone.

If perchance you had a moment to visit me today, just wanted to say....
thanks for stopping by!
have a good one,
k

Apr 24, 2014

Faux Watercolor Thank You

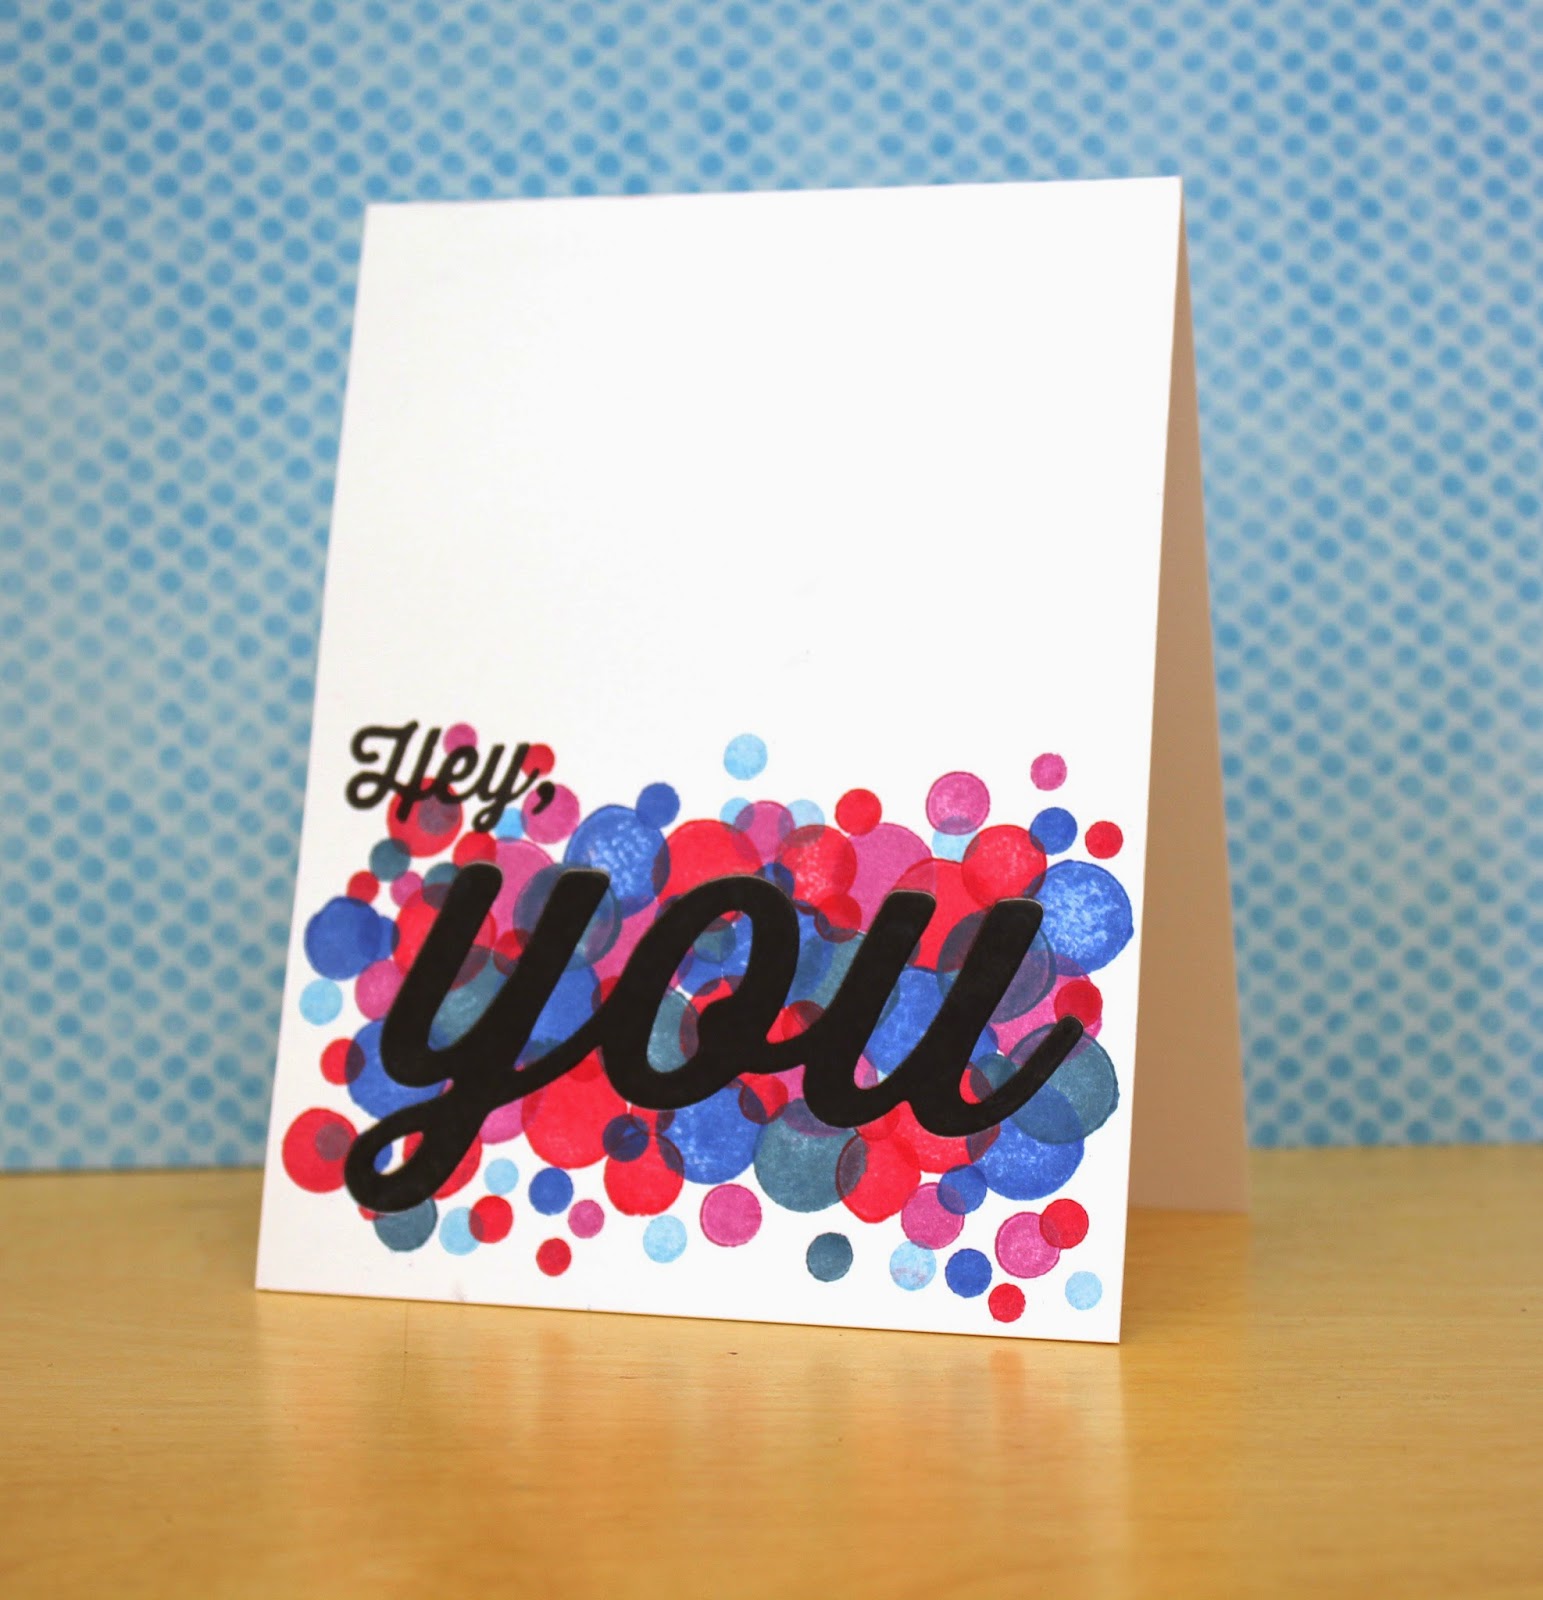
One of the things I love about die cuts is you can use both the negative and positive pieces. It makes fast, easy cards. 

Here is the negative from the card I made the other day (in the last post...just scroll baby!)
I love that you just pop the little bits back into the letters and its easy to read.


This background paper was made using Crayola washable markers. Can you believe it?! They run and bleed so well when you add water, its just like painting with water colours. I told you I would share with you the tutorial, but you really don't need one, its a very simple and hopefully I will explain it below well enough.
So, say you are dying to try this whole water-colour technique that's all the rage right now, but you don't want to invest in the product just yet. There is the perfect solution... Pull out your kids markers and go crazy! Just be sure you use WASHABLE markers and you will be fine.
Use nice water-colour paper and draw a design of your choice with as many colours as you'd like.  Remember its going to bleed so you don't need a ton of detail. I like to use big strokes and run them around each other.

After you have your paper marker-ed up, add some water with a paintbrush. I love colours blending, but not too much. I think it's nice to have a vibrant variety to look at. Of course everyone is different, so just create away!

Now once you are done "painting" and your paper has dried, go back in with a black pen and draw around the different shades of pooled ink. Even if there is a dark drop in a larger pool of light ink, draw around the little drop and then around the bigger one too. Basically outline every different shade you see. As you go, you will start to see how many different shades you really do get when colours blend! What happens as you do it is you get this marbled look on your paper from the added pen that's really fun to look at. It adds some dimension to your colours that you may not have noticed before.  (Click on the picture to see a close-up. That might help you see what I mean better)

I have one more to show you. This was one of the first ones I did. I just wanted a little bit of colour so I drew three circles in marker. Then added water:
See how they bled together and created more shades? Then I took a pen and outlined the shades. I love how it looks. What do you think? (Uh, don't mind the crap-tastic photo, I tried to crop the chaos out but, you know...)

I would love to hear your reaction and if you have time to try it out, be sure to send me the link. I would love to check it out!

Thanks for stopping by today. Hope you have a good one, wherever you are.
I'm just shutting down for the night. It's almost Friday here which is a big deal in our house! That means we survived another week of Singapore Maths and Malay Language classes at school! That's no small feat for my little boys (and the momma that loves them!)


loves to you and yours,
k

Apr 22, 2014

Sketchbook Saturday #120

Hey there. Just stopping in with another card today...

I love everything Iwana Palamountain does. I've had my eye on her and finally get a chance to participate in one of her challenges on her blog!

Here's her sketch.

I actually created two cards because with the first card, I realised as I was doing it, is a direct RIP-OFF from a Jennifer McGuire card you can see HERE:

Seriously, I'm so ashamed! Please tell me you do that sometimes too. It's like a subconscious thing and then when I finish it hits me like a ton of bricks. DUH! You didn't create this! You Crazy! (I had to post it anyway cause it's still cute, even though its not mine ; )

So after I got that out of my system, I sat down and made another card. Much more me. All me, in fact (although I did use one of her favourite Hero Arts die cuts, which is one of my favs too...)

I created this "thank you" die cut using a marker water-colour technique I found on a blog when I was searching for an art project for a class friend and I do here at our condo. And wouldn't you know it, right now I can't find the link! EEK!! I may have to do a little tutorial to show you how if I can't find it because really, its totally worth trying. 
 It's really fun because it makes amazing paper for die cuts because no two pieces are the same! They always come out different. Which I love.
I finished up by embossing (or debossing... depending on the side you use) for my card base. Glued that die cut down and called it good.
so there ya go. Challenge done!


Thanks so much for stopping in.
Speaking of my art class, I gotta run. Were making wall art displays with the kids today. Lots of painting to be done!

loves
k


You brighten My Day

I finally got my hands on the new Watts Up set from Simon Says Stamp. I just love it so much. So very cute. 

I couldn't wait to try it out and whipped this baby up. 

Again, I used the specialty paper and some distress inks by Tim Holtz to do the background. I covered it with colour and then spritzed it with water. It made this cool mottled look. Matted it with black and added it to my card base. Then just stamped the other images over it and added a pop up heart in yellow. Pretty simple.

I am really loving distress inks. I could live on Jennifer McQuires You Tube page and watch every video (oh wait, I DID!)
I love all the possibilities and hope to do more soon. Did you see the resist technique with the ironing? I know... you want to try it too...

Thanks for stopping by today. I'm going to try and take the kids down to the pool today. I mean, we live in Singapore, so we should, right!?

loves
k


Apr 21, 2014

Happy Easter!

Just coming by to say hello and Happy Easter to you!


I made up a little basket for a friend using the tutorial from Jennifer McQuire that can be found HERE.
I actually took an old circle box and covered it with paper and added a handle, so that's not the part I'm showing you. What I did add was the bow she shows how to make. Simple and easy just like she says.
I love it.

Hope you have an amazing Easter!
loves
k


Apr 20, 2014

Runway Inspired Challenge #58 and CAS(e) this sketch #73

 So this is my very first shot at a Runway Inspired Challenge and a CAS(e) challenge!!
I have eyed them for awhile but it's taken me awhile to get my crafting groove working for me in this new space. But now, I'm ready...

Hopefully I can keep this up! 
Heres the challenge...

It's actually a 2 way challenge this time with a CASe sketch too.

Here's my take on these challenges:

By way of explanation.... I've been looking for the Tim Holtz distress water-colour paper everywhere.  Well, maybe not everywhere, but there are few places that I have found here in Singapore that have crafty supplies and I have been out of luck finding the paper I want. But, I did find this specialty paper by Ranger (Inkssentials) that is slicky and shiny and for all sorts of mediums, or so it said on the package. So I pulled out my ink pads and used them like watercolors. The difference is it doesn't soak in and bleed like water-colour paper would. The ink sits on top and pools in this really fun way. 


Overall, I like how the paper took the ink, but of course its totally different than I had expected. Which is good! I ended up using something like 8 different inks because I was looking for the right shades and didn't know how they would take. They started to mute when I dried them with a heat gun, so I had to reapply over and over. I had better vibrant pools of colour when I just let it air dry. Good thing to know, eh?

The other thing to note is the black background paper... I actually ran it through my Cuttlebug with a Provo Craft embossing folder and then drew inside the indentations with a white gel pen. I wanted to mimic the shorts this hot lady is wearing in the challenge. I just needed to figure out how to do it best. I thought of just stamping but couldn't find a background stamp I was happy with. (how is that even possible with all the stamp sets I have!?) I like the texture this gives the background. It's the kind of card you want to touch. which I like.

Anyway, I was realising Mother's Day is coming up and I need to get moving on my card so it makes it back to the states in time for my momma to feel the love! Feels good to actually get it done on time.


Alrighty, thats it! Check out the challenges Here and Here.
Hope you get to play along too!

Thanks for stopping by.
k

Apr 19, 2014

Hey There Little Lady

Yeeeee-Haw!!
Hey there! How's it goin'?

Wanted to share this little guy with you...

He's from Paper Smooches Green Acres. I love his big grin. It makes me smile! I don't know about you but when I get some images that take colouring, I like to stamp an entire page of images and colour in front of the tv. I then keep them in a little pile on my desk and use them as I see fit. I love being able to look at them everyday! This guy was screaming to get used!

I'm still working on my Copic colouring and as I sit here I realise I could have added a lot more shading to his hat and shoes. For some reason the photo doesn't show it very well. Or its not there at all. Hmmmm, I should investigate that. Right after my nap ; )

I used Waltzing Mouse Off Beat Backgrounds for the background stamp and just repeat stamped it, overlapping with 4 different colors. Two colours each at opposite angles.

I used the sentiment from Waltzing Mouse Back in the Saddle and stamped it on a piece of kraft paper that I had die cut with Paper Smooches Quotable Dies  and sponged with Distress Ink.

You can't see it very well, but I outlined his little piece of hay with a Sakura glitter pen. You know, for his "amber wave piece of grain." Adds a nice shimmery touch. And I always like shimmer.


Ok... that's it for today. This week I have found that I haven't had as much stamping time as I would like. I walk by my office and peer in to see the table strewn with crafting items. I long to have a big block of time that I can indulge and try so many new techniques (new to me) and ideas I have percolating.  But you know, there's always something else thats pressing.  And really to cover everything in one sitting would take days!
I need to get better at being able to jump in and out of it at a moments notice, but I'm much too enthralled and can't pull myself away! Even if everyone is fighting and there is screaming and tears, just leave me alone, I want to stamp!

ok, folks. enough ramble. thanks for stopping by!
take-er easy.
k


Apr 17, 2014

Paper Smooches Picture Perfect Sparks Challenge!

Hey there all! Just dropping in to share a little sumthin'. 
I actually pulled off a challenge within the allotted time. Crazy, I know!


I'm joining over at Paper Smooches to share in their Sparks Challenge. I think I told you awhile ago that I just got a whole SLEW of Paper Smooches stamps. I have been eyeing them for so long that when it came time to order, I just loaded up my cart. So many amazing images to play with!

Here is the inspiration photo:

And here is my take:

I LOVE this doll image from Knick Knacks. Just love it. I kind of went with a color/space inspiration with this one. I used my Falling Hearts stencil for the background to mimic the visual aspect of the inspirational photo. Colored up my doll with similar colours as the photo and popped her up with dimensionals.
I did a mixed bag for my sentiment. DOLL was with outline alphabet (PTI) and YOURE A is a different stamp set too (Simon Says Stamp).
Colored the outlined letters with a Copic. I added a leftover circle I had sitting around and sponged it with some ink for her little sunshine halo-y thing behind her. I felt like it would make her pop a bit more. Put it all on a Pure Poppy card base (PTI). And Voila! You're a Doll!


Welp, that's all she wrote folks.... I'm glad I got to get in on this challenge. Join in the fun by clicking HERE!
thanks for stopping in!
k


Apr 9, 2014

Oh Dang!

A little late birthday card for you!
featuring Paper Smooches....
 If you look really close you can see white splotches on this card where I tapped my ink across my die cut plate before I used it to make an impression on the front of the card. I coloured with Copics and popped it all up with dimensional adhesive.

Seriously, I love this chickie. It just seemed like she would be saying this... Oh dang!
 I forgot your birthday! (in the cutest southern chickie voice maybe?) 
I didn't have a "forgot your birthday sentiment". So I went with this one instead.
 It would have been MUCH more perfect with a different sentiment inside. I do realise that. But you do with whatcha got!


This is a little card made for the Anything Goes Challenges over at the Paper Smooches blog. Also, for the May Guest Designer spot! Woot!

If you have some time, grab some Paper Smooches and give the challenge a whirl! 

thanks for stopping by!
k


Apr 5, 2014

Paper Smooches: Hey TV

I've shared this card before but I'm sharing it again on account of a shot at Guest designing spot over at the Paper Smooches blog in May! Wish me luck!


I used these adorable TV images in one of my favourite colour combos. Hot pink and aqua! Really, I don't think you can go wrong with hot pink. Not nowadays. I just need to grow me a mullet and wear a super stretchy mini skirt and my jelly bracelets and I am ready to go! Sweet.

Anyway, my tv is backed by some chevron die cuts that I stamped with a crosshatch image in black. Added a sweet little heart and a rhinestone for good measure.

Pardon the photo... its just crap-tastic, I realise. This was after losing camera #1 and not having a real crafting space in my new apartment. Things are definitely looking up, although I have also "lost"  camera #2 (i.e. left in a cab...again!)  
I am officially off cameras. Until further notice. I just cannot be trusted! 

Thanks for stopping by today. I'm shutting this night down in my neck of the woods. Almost time for some shut eye.
loves,
k


Paper Smooches: You Rock

Ok. I think this is bringing our Paper Smooches-water colouring bonanza to a close. At least for a little while  ; )

Can you tell I was on a roll one night? I guess I loved doing it so much I couldn't stop! I am really really loving the water-colour trend. Are you trying it too? Seriously, you should. It almost feels like flying *almost* 
Go on now! There's no stopping you!
 Ok, details... I water coloured my paper and then spattered it (and my entire desk and other cards and envelopes!) with black. Just FYI if you want to do the splatter thing. First off, move EVERYTHING off your desk. Seriously, just do it. You will thank me later. Oh, and maybe wear an apron. Or take off your shirt or something. Or maybe it's just me. That's possible too.
And second, wait until your initial water colouring has dried before you spatter. Cause if you don't, that spatter job is going to run run run! Which is fine, if that's the look you are going for. It wasn't necessarily what I wanted, but it still turned out ok. This stinkin' cute rocking horse really makes up for it! Doesn't Kim just do amazing work! I love her stamps! (yes, I know I keep saying it and saying it!)
I watercolored, then spattered, then dry embossed with a Provo Craft embossing folder, and then stamped the sentiment. In that order. Then popped up my horsy with dimensional adhesive and called it good.
And then I rested ; )

thanks for stopping in.
loves
k


Hello Baby

Are you up for another watercolored baby card? Good thing, cause that's all I got today.

I tried a new thing this go-round. I watercolored, like I usually do. Although I do wish I would have blended a bit more, but that's over now. What I did try was my hand at was making this super shiny die cut/embellishment. I did it just like all the pro's showed me! However I'm pretty sure they don't emboss their desk while they do it. I'm still trying to scrape all that off. What a mess!
I die cut 4 "baby" sentiments and glued them together. Then covered them with glue (honestly, Singapore doesn't have Versamark!?!? GASP!!) and then heat embossed it over and over and over again until it was thick and shiny and oh, so lovely!
I liked it.

Colored my frog with Copics and added a little die cut crown. I did wonder, does this say I'm calling the baby ugly like a frog? Cause, that's not what I meant at all! Maybe it looks like I'm saying "kiss that baby!" or something. I dunno. I just always have a small freak out at the end of each card, and today it was about the message it sent and not the way it looks. sigh.
Anyone else ever do that? Or are you actually well-adjusted? 
I love all things Paper Smooches. If I ever met Kim, I would totally smooch her... on the cheek of course! And for making such adorable stamps! I just love them. 


ok, folks. That's all for today. Gonna run.
Hope to see you again soon!

k


Apr 3, 2014

Paper Smooches: Welcome Baby

You're gonna see a lot of Paper Smooches over the next few days. Cause I think I ordered every set Kim has ever drawn. I'm not kidding. Oh, and a loooooot of watercoloring. I think I have watched every video Jennifer McGuire has done. I can't. stop. watching. Seriously.

So let me show you what Jennifer taught me when I finally stopped watching long enough to make something!

Welcome Baby!
 I really want to get my hands on some of that Distress Watercolor Paper by Tim Holtz. I have some regular water-colour paper from the art store but it warps so badly when you use it, it makes me kinda crazy. I need something tough and durable cause I like using LOTS of water... As I sit here thinking, I don't remember what watercolors I used. I've tried it all.... kids watercolors, washable markers (will show you what I mean soon, its pretty cool), water-colour pencils, ink pads and water. But for the life of me I can't remember what I did. That's just crazy!
I added a hand cut and scored vellum banner and a little pile of string in the background. I've seen this string thing around the blogosphere for awhile now (love when Laura Bassen does it) but I was such a bumbling fool when I was doing it. I kept thinking, "Surely, they just wad it up and drop it down, right?" Well, that must be some special string cause mine was not doing any wadding or dropping. It would tangle then move with all the static I created trying to wad it! It was super intense for a moment, I think I started sweating (you can almost picture it, right?) So, that string probably took more time than the watercoloring. Seriously, someone should do a video on the string alone. That would be helpful. ; )

I added some colouring to my elephants using Copics, a sentiment and some pearls.
Voila! Baby card done. Now I need me a baby to give it too...


Thanks for visiting today. Hope you have a good one!
k

Apr 2, 2014

You're The Bomb


Hey all! Well, I have been a naughty girl and have bought WAY more paper crafting supplies than I should have. And after the first, then second, then third order to Simon Says Stamp, I realised I need to pull way way back! I think living over seas gave me an excuse to order lots cause you get free shipping if you order lots, right? And you know how shipping can get expensive! Do I want to pay $50 to get it here or put that $50 to good use and buy real stuff with it? Even if that means putting me in the poor house? You better believe it sister, I'd much rather craft in my poor house than count my money... ok, ok, you get the picture now.  On with the show!

I got out some of my new goods to make a card. My sweet sweet sister in law has been some pretty tough times this past month and there have been so many amazing people that have to come to her aid that she needs a slew of thank you cards. So I started putting all those new goods to use!  See! Totally worth all those orders!


Thought I would share a few of them with you, starting with this little guy.
What you see here is some amazing Martha Stewart Neon Glitter. I don't have a sticker maker so I opted to "rub" my tag with some glue. Turns out when you do that, it gets really really splotchy. Kinda like a bad sunburn.
And while I didn't end up with the amazing tag I wanted, I kinda like what happened instead. It makes it even more hip having it wild and crazy like that. (Note to self: buy a sticker maker with next order!)
Other things you see, some new Scotch brand washi tape, Simon Say Stamp feather die cut, Papertrey Ink tag die cut and PaperSmooches sentiment. All popped up on a Winter Wisteria card stock base by Papertrey.


I like what's going on here. Hope you do too. Have a lurverly day!

thanks for visiting.
k

p.s. while taking this picture my camera lens fall apart in my hands. Don't know what was going on there, but I think the focus is a bit wonky. Hmmmm, maybe momma needs a new camera too! (Oh man, I better get a job!)


 photo copyright.jpg
envye template.