Jun 23, 2015

Paper Sweeties Guest Design post !!

Hello there! Today I am sharing some cards I made for as a guest designer for the Paper Sweeties blog. Check them out!

Here is my first card:


I used the adorable Celebrate stamp set to make up a cascade of sweet images. I stamped them all in Memento ink and then coloured them with Copic markers. 


I then used the  "sweet" sentiment from Happy Happy Sweet cuts. But instead of using it as a die cut, I used it to emboss! I just embossed the SWEET across the top and trimmed the panel before adhering it to the card base. I LOVE using die cuts for embossing. It helps spread the use and function of an already great product!

Next up is this Happy card:

I used the two party hat images to stamp my background but left a small gap in my stamping close to the top so I could fit my sentiment there.


I then die cut 4 "happy" sentiments from the Happy Happpy Sweet die cut set but this time used it as intended. I die cut 3 black sentiments and one gold glitter sentiment and shifted it to show the black shadow peeking out from behind. I then added a strip of the gold paper to the side of the panel on the card base to match everything together. I also added some Wink of Stella to each party hat, but unfortunately you can't really see the shimmer in this photo. Which is always too bad. I love shimmer!!


Well thats all for today. Thanks so much to Debbie for having me over at the Paper Sweeties blog! I loved working with her great products. Go ahead and jump over to shop at the store! There are lots of fun things to be had. I was sure to stock up on her Bits and Bobs of beautiful ribbon, twine, sequins and colourful paper straws which I ALWAYS have wanted but never have had until now. Thanks so much Debbie! :)

until next time,
xoxo
k


Jun 7, 2015

Join me over at A Walk Down Memory Lane blog for this week's post. I'm using the fun Summertime Charm stamp set by Lawn Fawn and adding in some acetate and Copic markers for good measure. Come check it out! HERE:


Thanks for checking in... Have a great weekend!
xoxo
k

Jun 6, 2015

Freehand Watercolor Condolences

Hellooo there Sweet Stamp Shop fans! I'm here to share with you a fun technique for today.  I think the hardest cards for me to make are condolence cards. I never seem to be able to find the right image I want to use. Well, I love the Sweet Stamp Condolences sentiment set but its just that, only sentiments. Well have no fear, enter in freehand watercoloring! I think there are so many great sentiments within the set that can be used and I kind of like knowing that I can now choose whatever image I want because its actually really easy to freehand a water-colour card. Let me show you what I mean.

Here is my final card. Because it is a condolence card I wanted it as SIMPLE as possible. No bells or whistles on this one, but still beautiful.


First, I feel like flowers are a very appropriate and safe image to use for condolence cards, but considering it is a sensitive time, it still has to be just the right flower image. I google searched 'flowers' and of course a whole slew of images came up. It didn't take me long to find one.

It spoke to me in just the ways I wanted it to. It said two things: 1."I'm an easy shape that you probably can't mess up" and 2. "Paint me!"

Now let me preface this by saying, in a very very serious tone, that I in NO way consider myself to be a person who can draw. True story, cross my heart, I never tell a lie. And that is exactly why this technique can be done by anyone. If I can do it, so can you. Promise! Also don't forget, water-colour is very forgiving so it doesn't have to look perfect to be lovely. Now, that's my kind of art :)

Ok, so I just kept my googled image close to me and traced it out with a pencil as best I could. This is when picking an image with very few lines is really really helpful.


After I got it how I wanted it, I picked some Distress Ink colours and a aqua brush and set to work. Remember, Distress Inks are formulated to work with water so its like having water-colour paints in your ink pad. I just smoosh them onto my craft mat (you can use an acetate sheet or even a plate) and add some water to them.


I started by having the light source hit the top of the petals, but as time went on I changed how I wanted it to look. I will show you that a bit later. First, a few tips for watercoloring: 1. Be sure to water-colour sections that don't touch each other because unless the sections are dry you will get some bleeding. And you definitely don't want that! 2. Run your clean water over the section you want to paint first. This will help the color spread and not be so concentrated. Just how water-colour should be. 3. If you are impatient like I am, heat up each section after you are done painting. It dries faster that way. Plus you can add different colors without too much bleeding if you want heavy shadows.

After doing the lighter wash, I went back in and added darker shades and different colours. Especially to the sections where the light source would cast a shadow, like where each new petal overlaps another petal. 

Also, you can see in this picture that I changed the light source to the left side of the flower, but only after I had painted it already! I did this by rubbing around a fair amount of clean water and lifting up the color with a paper towel. You can do that trick over and over until you get it as light as you want. That is the beauty of water-colour!


After it dried, it was just a matter of trimming down the panel and adding the sentiment. Simple but beautiful.


I also added a few rainstones to help pull the focus to the sentiment a bit more and adjusted the water-colour panel to be down in the bottom left corner which helps shift the weight as well. When putting a card together be sure to step back from it a bit to get a feel for the balance of the card. This can help you be sure it looks just right.

And that's it for today! Thanks for joining me. I hope you learned something new today and found some confidence to try this technique for yourself. I would love to see what you create so if you do try this out, be sure to leave a comment so I can come check it out! This was intimidating to me for the longest time, but once I tackled it I felt so much better! I hope you do too.
Also, check out the Sweet Stamp Shop Facebook page and also Instagram for so much inspiration your eyes might pop out! 

Until next time,
xo
k

May 23, 2015

Single Layer Stamping

Hello there Sweet Stamp Shop fans!  I wanted to share a quick card with you that doesn't involve much but some stamping and colouring. This is a fun way to make fast cards when you're in a pinch for simple but great!


I started by picking one simple image. You can do this with a number of Sweet Stamp sets. Look through your stash and find an image that you can repeat and color to create a great focal point. I stamped my images and overlapped them a bit. Don't worry about overlapping! You can color them in and blend the colours or you can stamp the images in different colours and leave them plain inside. That can be a fun look too. For this card I decided to  color in the balloons to make more of a statement.

I did some blending with my Copic Markers. You do NOT need to own Copics for colouring. You can blend using any alcohol markers plus you can also get a great blend using coloured pencils. I started with the mid-tone color, then the darkest color, then went over it again with the mid-tone and then finally the lightest color. If you are using color pencils, you can get a great blend by colouring in small circles. This will prevent those lines you get when you usually color.

I also used a darker color to add some dot details to my bear as well as a lighter pink color to do the cheeks and ear. The lighter tones of alcohol markers will removed the dark color kind of like an eraser. Then it left a little pink tone in its place.

The colouring went together fast! This is the kind of card you can make up while watching TV or chatting with some friends. Stamp out a few panels and then get to colouring!  I also added my sentiment from my very favorite Sweet sentiment set called Happy Birthday. It has so many great fonts. If you don't have this one yet, you really should check it out! I finished off the card by trimming it down a bit, adding it to a card stock base and adding a slew of enamel dots.

Thanks for joining me today. I hope you feel inspired and learned a few things along the way! Now get going and get stamping!!
Also, be sure to check us out on Instagram. There is always something inspirational coming your way plus you can chat with other Sweet fans and the DT is there to answer any questions you may have. 

until next time,
xoxo
k

May 22, 2015

Sweet Stamp Shop May Release


 Hey there! Long time no see, eh?? Welcome welcome! Today I wanted to show you a little bit how I made this card here for this months Sweet Stamp Shop release.

Here is the card:


I started by doing some mask stamping around this little coffee guy here. The HAPPY sentiment is nice and big so it was easy to just ink up the H first and then move onto the PPY after. I colored in the letters using Copics in a bit of a gradient.

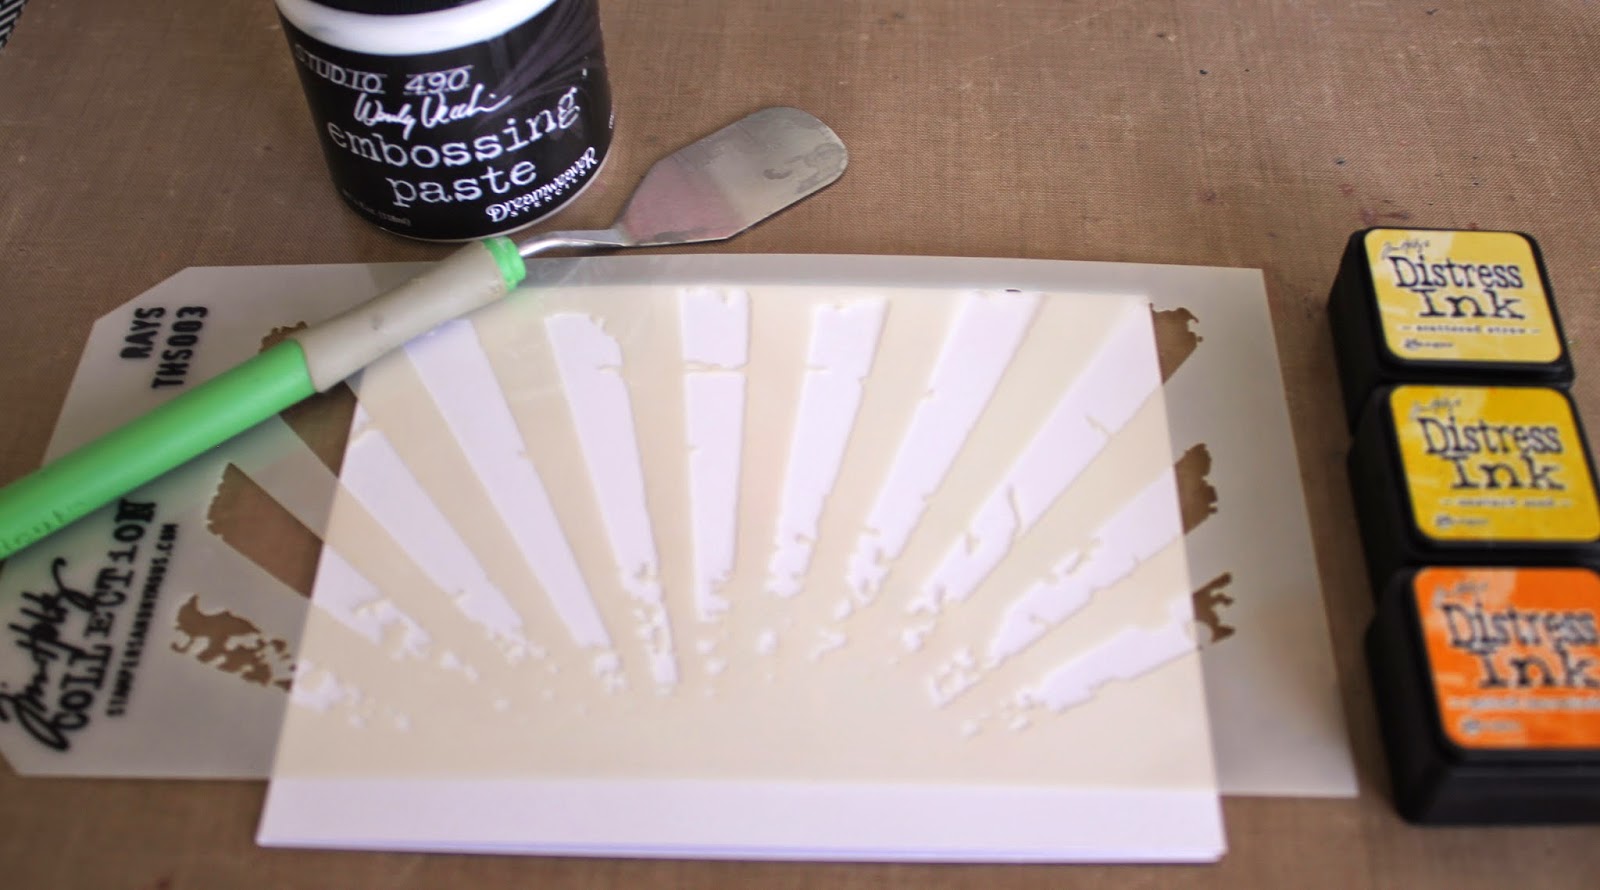
Next I laid down this Tim Holtz stencil and mixed up three different colours of embossing paste using some Distress Inks. I smeared it around on my craft sheet that you see there. That thing is a wonder! I love it so much. Kind of wish I could cover my whole desk in it.

Nexxt I started at the drakes and smeared in the paste at the bottom being careful not to go too high because I wanted the color to grade up. I then applied the next two colours. 


Reallyl the hardest part about making this card was waiting for it to dry!! That is actually why I then covered it with some Glitter embossing powder and heat set it all. Made dry up nice and fast.


And there you have it!! Have you check out the Sweet Stamp Shop store? All the goods are there ready for you to buy. Go take a look!

Thanks for stopping by!
xoxo
k

Apr 22, 2015

CutCardStock.com Happy Spring Box Template

I am over at CutCardStock.com this past week sharing a new box template for this Happy Spring box below. It is my first EVER template and I was sweating bullets over it! Well, it was a learning experience for me, for sure. Maybe I will do it again some time! If you do jump over and download the template, let me know how it works! I would love some feed back.


I used the cute cute Wplus9 stamp set Fresh Cut Florals I picked up at A Walk Down Memory Lane. I love the images in there!

So, how is your week going?? I'm having one of those, "I have a lot to do, but would rather watch this movie" kind of a week. So, that's what I am going to do. I can always work tomorrow ;)

Anyway, thanks for stopping by! I hope things are happy and healthy in your neck of the woods. And maybe you will get a little bit of crafting in today. yay!
xoxo
k

Apr 15, 2015

Sweet Stamp Shop April release

Welcome Welcome to Sweet Stamp Shop release day!! YAY! I have two cards to share with you using only 2 images from all of the amazing sets that are being released.

Here is the first one:


These little critter images that Nicole designs are always so adorable! I coloured mine with some Copics.

Then I added it to some polka dots and some vellum. In my mind, that is all I could think about when I saw the sentiment. This card is all about pretty and pink!


Next I pulled out my watercolors (i.e. Distress Inks) I did some white embossing using the Happy Sentiments set and then watercolored over it for an embossing resist.

I then die cut some vellum and sewed it over the sentiment panel. 


I coloured my bear, net and butterflies with some Copic markers and popped them up with some dimensional adhesive.

That's all for me today. Be sure to jump over to the store to see all the new sets available. There is so much Sweet cuteness, you could pass out. So be forewarned!!

Thanks for stopping in today
xoxo
k


 photo copyright.jpg
envye template.