Jul 31, 2014

CAS(E) This Sketch #86

Well, lookie who's going crazy and posting twice in one day! What's going on over here, is Kristie going 'crazy-town!?'  Well yes, yes I am, or else why would I be referring to myself in 3rd person? 

Ok... enough of that already. I'm here to get in on CAS(E) This Sketch just hours before the deadline!

Here's the sketch:


And my card:

I kept it simple by doing on one layer stamping and you know, I'm still getting used to this sparkle spray. Anyone have any pointers they can give me? It's either a TON of spray or these crazy big dots. nothing nice and in-between that makes my card look carefree and confident. You know? I guess I just need practice. But I do love the sparkle it gives. I had to add some sequins to cover up some of those renegade splatters. Oh me, oh my!


I layers some embossed paper and some glitter in there too and called it good. And in all honesty (and what good am I if I'm not being honest?) I really don't like this card... at all. BUT! Challenge done! So onward and upward.

Ok. That's it. I'm heading back to my craft room to see what else I can whip up for fun and maybe this time I will actually like it ; )
Thanks for stopping in.
love
k

Just Saying Hello


Hello! Just stopping in really quick. I have some old cards that desperately need to be shown so I can move on. Too many in the archives that are collecting dust!

Here is a simple one using a water-colour technique I keep meaning to get on video. Anyone else out there completely intimidated by video software!? I need to get cracking. I know I can figure it out, I just need to, you know? Well when I do, this will be the first video I do. What I like to call Faux-Watercolor...

So this is how it goes.... you get some water-colour paper and some washable Crayola markers and go to town. Scribble the crap out of it covering the whole thing and then you add water and watch it swirl! It's simple and fun. Then you die cut whatever you want out of your page and make a card with it. Easy!

I had this little airplane that I had embossed with white onto vellum. I found it in the ever growing stash of bits I have made but end up not using. PLEASE say you have a big pile too!? It's getting out of control. I'm going to have to start crafting my stash to keep from being buried in it all. Anyway... just added a cute heart trail for my plane (Mama Elephant) and popped up my letters.

And that's all. My simple hello.
Hope all is well for you this mid-week. Thanks for stopping by!
xoxo
k

Jul 30, 2014

Hello Friend

Hey-lo there!  Glad you stopped in today... I've been working on some things to show you next week and I have decided that my card making has slowed waaaaay down. I worked all morning and only have 1 card to show for it (and I can't even show it to you yet!) All morning? Really? That's just not wise time management.  I used to whip these babies out, but no more. Something in me has changed and each decision takes so much more time for some reason. Sometimes being a perfectionist just isn't time effective! But I will say, I do like the results and if I can craft all morning without being disturbed then the stars are alined and I need to keep my mouth shut and enjoy!

Ok. Onward.... Here's a little card I made up awhile ago. Since I can't share anything I'm working on now, I thought I would dig it out..
I don't think water-colour is going away for a long time... at least for me. I just love the results it gives. So, hope you like it too!  


Starting with some Versamark Ink and my card stock base I stamped the leaf and acorn image. I love Versamark on dark card stock. It's one of my favourite things. Its a nice subtle yet effective result. You should try it. 

I then stamped my squirrel onto water-colour paper and swirled some paint on him. I then used my favourite notecard die cuts by Clear and Simple Stamps and cut out the squirrel card. I then stamped my sentiment (Mama Elephant) and sewed some bakers twine through the top. I have the Sew Easy rotary tool by We Are Memory Keepers that works pretty well. It's a little bit of a push though the heavier card stock but I like that it keeps my line straight where as if I was doing it by hand, it would get way too messy.


Ok. There you have it.  A little card for a friend.  Thanks for stopping in today. Stay tuned next week for some fun news! 
love to you
k


Jul 26, 2014

Happy JillyBean Birthday!


Happy Saturday everybody! It's been exactly one week but I'm glad to be back. I have a little Jilly Bean Soup stamps to share with you. 

Check it:

I started with some 6x6 white American Crafts white card stock and sponged in some NEON Hero Arts ink onto it. I like it nice and vibrant! I then die cut the shape using these amazing die cuts by Clear and Simple Stamps. LOVE them!

I stamped the numbers on the back with StazOn Opaque Grey ink and then stamped over it with the sentiment in black. I stamped part of the sentiment on the die cut and part of it on vellum and then popped that up, wrapping it around the die cut. This was before my clear dimensional adhesive showed up in the mail  ; )


 I stamped my balloon with NEON blue Hero Arts ink and popped it up too. I added it all to my white card base and added a string to the balloon.

And that's it. Have a great weekend! Thanks for stopping in.
xoxo
k

Jul 19, 2014

Tag...You're It Challenge #2

Happy weekend to you! Today I wanted to squeeze in a little something and this new Tag You're.. It! Challenge blog was just the thing. Tags are great. Fast to whip up and so satisfying too. Here is this weeks challenge. Tag by Guest Designer Laura Bassen (the great!):


I love Laura and her "smoosh" technique. I used the same technique and colour combo for my tag. I started with clear embossing on my Tim Holtz specialty paper. that had been die cut with a Paper Smooches die cut.  I then rubbed three distress ink colours on my craft sheet and spritzed with water. 


I smooched my tag into the ink and heat set it. I did this a few time though to get the colour where I wanted it.

Then I just had to make up my tag! I used these great die cuts from Little B. I die cut my sentient from vellum and white card stock and shifted the vellum underneath just slightly to add a bit of a shadow to my sentiment.

 I added a staple to the sentiment tags and a little embroidery floss bow to the upper corner. And voila! Done!

Thanks for stopping by!
k


Jul 18, 2014

Runway Inspired Challenge #64 Bottega Veneta

Hey all. It's finally the weekend! Woot! I tell you, this week has been looooooong. And I have nothing to show for it but this months Runway Inspired Challenge.  But I'm not going to complain, cause at least I did get it done.

 Check it:


And here is my card to share with you:


I wanted to use a nice mellow grey for my card stock and I had ONE piece left. Gasp! So you can see it below. It even had a bite taken out of it. I stamped my flowers using HA Soft Cantaloupe and Unicorn white, CSS My Style Blueprint, and PTI Limeade Ice. I then trimmed my sheet into 1 inch strips and mixed them around. I didn't want to lay it down in the pattern.


I arranged them on my card front but not straight. I love the layers on the dress and that they aren't cut evenly. So I tried to mimic that by layering my strips at random slants.


I added a doily that I cut in half and then trimmed smaller so it was more of an oval. I then added my sentiment and some enamel dots.

That's all for today. I finally went through all my pictures and have edited them all. Finally I'm not behind! Well, when I finally get around to posting them that is. So stay tuned.

Have a great weekend!
k

Jul 14, 2014

CASE Study Challenge #199

Hey there peeps! I have been battling a fever all weekend and when today came I was determined not to let it get in the way! Because of course, my mojo has been struggling for the last little bit and there is no better way to get it going again than with a challenge. So I joined in CASE Study just in time.

This weeks muse is Shari Carroll. And as you know, she is amazing. She has all the knowledge, the techniques and the talent! She really got me working. Thank you Shari! 

Here is the inspiration:


Here is my card. I did keep it simple because I had limited brain power but I did feel pretty good about it since it came together fast. I had a little guy at my heels begging for food and a chance to paint. Needless to say I had to get this thing going fast!


This is what I did. I painted some text print with some Kaiser Craft paint and then die cut them into circles. I added some Paper Wings Productions stamps (Sacred Geometry) to the circles. I stamped and fussy cut my sentiment and die cut 2 butterflies one out of painted text print and one out of vellum. I glued the butterflies slightly skewed and added some Basic Grey enamel dots. Before I laid everything down I did a quick water-colour wash in white on my kraft card base. I wanted a little something on the bottom and this worked out well. Nice and simple.

And here is a close up:

Cardstock base is from Simon Says Stamp. Butterfly die cut is Papertrey Ink. What else have I missed?? Oh yes... a thank you! Thank you to you friend for your sweet visit. I have has so many of you stop in and comment and I am behind in hopping around to everyone else. I hope to get some tylenol, some hot water and my computer and hop by to say hello to you! Thanks so much for your visit!


Until next time.
k


Jul 10, 2014

Simon Says Stamp Wednesday Challenge: Let's Be Clear

Hey all! I'm baaaaack! So our summer is now officially, officially over. I tried to squeeze every last bit out of it, even into the first week of school. But now, there are no last hurrahs left. SO, I'm back to crafting and need to get my groove going again. So I thought I would try it with this weeks Simon Says Stamp Wednesday Challenge! 

This week is all about using something clear on your card. I chose to use some acetate and some clear pop up dots and some clear ink (i.e. versa mark) for some embossing. 

Here's what I did:


I have this new Paris set Paper Wings Productions thats a lot of fun to work with. I keep making these Eiffel Tower cards... I can't stop! I stamped the image in Ranger Archival ink and trimmed around the image. I have this new Kool Tak double sided foam adhesive which is clear. I'm so glad I have it! I finally get to do things like this without worrying about how to hide the adhesive. It's so nice.

Now bear with me, this card was a bugger to photograph. I promise its much prettier in real life! I stamped my MFT Jumbo Mod Border stamp repeatedly on my card base and embossed it with some Liquid Platinum Embossing Powder. This stuff is all its cracked up to be and more. It has such a cool (as in awesome) warm finish that you just want to stare at it. all. day.  I highly highly recommend it. (using it, not staring at it.. unless you want to of course ; )


I stamped my Waltzing Mouse sentiment three times along the side and then added some Doodle Bug sugar dots in varying sizes. (smallest to largest)

And here is the close up:
Ok. Thats all for me today. Oy! These pictures!... Anyway, I hope to get in some more by the weeks end. And its almost friday here so I better get cracking! Thanks for stopping in today. Hope you are all doing well!

loves,
k


Jul 6, 2014

Hey There Beautiful


So this is the very first card I made using the Peerless watercolors. I said it before, and I'll say it just once more... Holy Smokes, these watercolors are amazing! SO incredibly vibrant and yet fun and easy to use. All that I am looking for. 


I finally got my hands on some Altenew stamp sets (its been crazy trying to track them down and scrape them together. I still have a few more I'm dying to own and everyone is out of stock!)

I started by embossing my flower images with white embossing powder on water-colour paper. I used some red, pink and amber colours to wash colour over the entire panel. I also picked up some new Wink of Stella pens and I love them too! So fast and easy to use but with a sparkly power that will knock yo' socks off! I can't believe I have gone so long without them! I highly recommend them if you haven't taken the plunge yourself. 


I finished off my card with a blended sentiment from Simon Says Stamp and Wplus9 and a onyx pearl dot. I love looking at this card because the colour just send me a nice shot to the heart and makes me happy!


That's all for this weekend. I will be back next week to share more. We are on a quick weekend family trip before really committing ourselves to another school term. But I will get cracking on more when I return, promise!

thanks for stopping by.
k

Jul 4, 2014

Paper Wings Productions July Blog Hop

Hey there! I'm joining you today as a Guest Designer for Paper Wings Productions! I'm excited to participate in my first blog hop. Today's hop is all about the colour Yellow. So lets get to it!


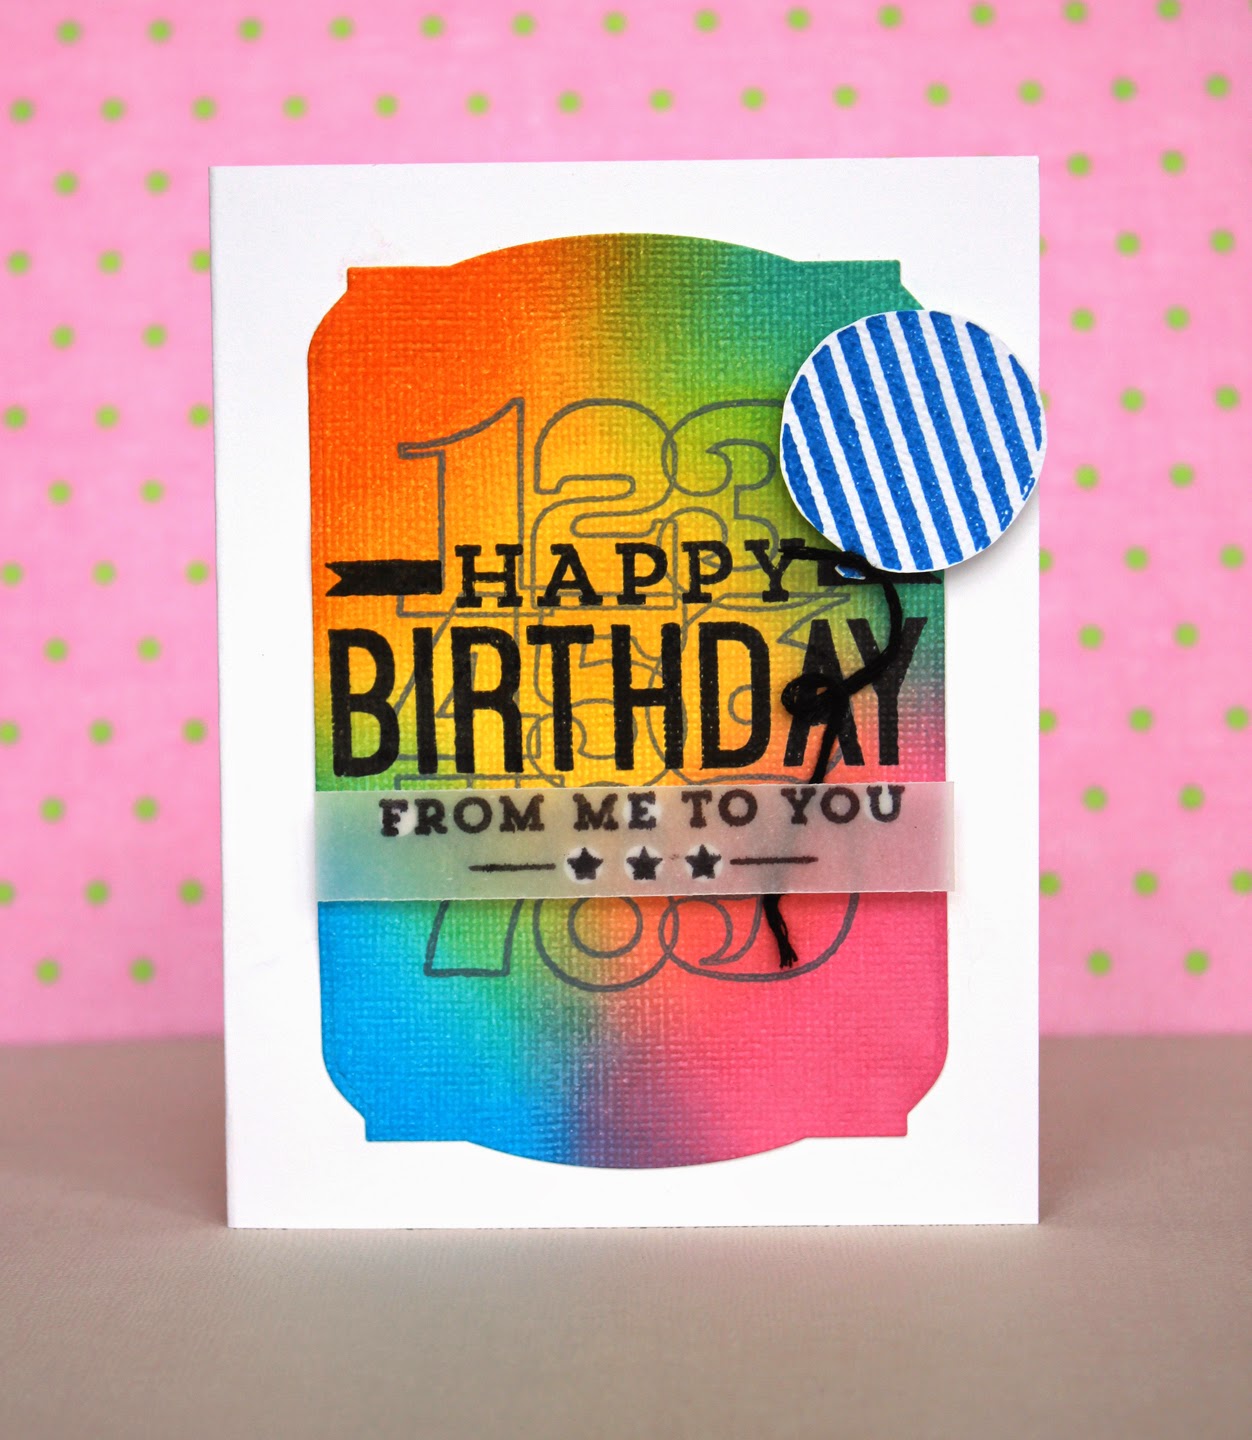
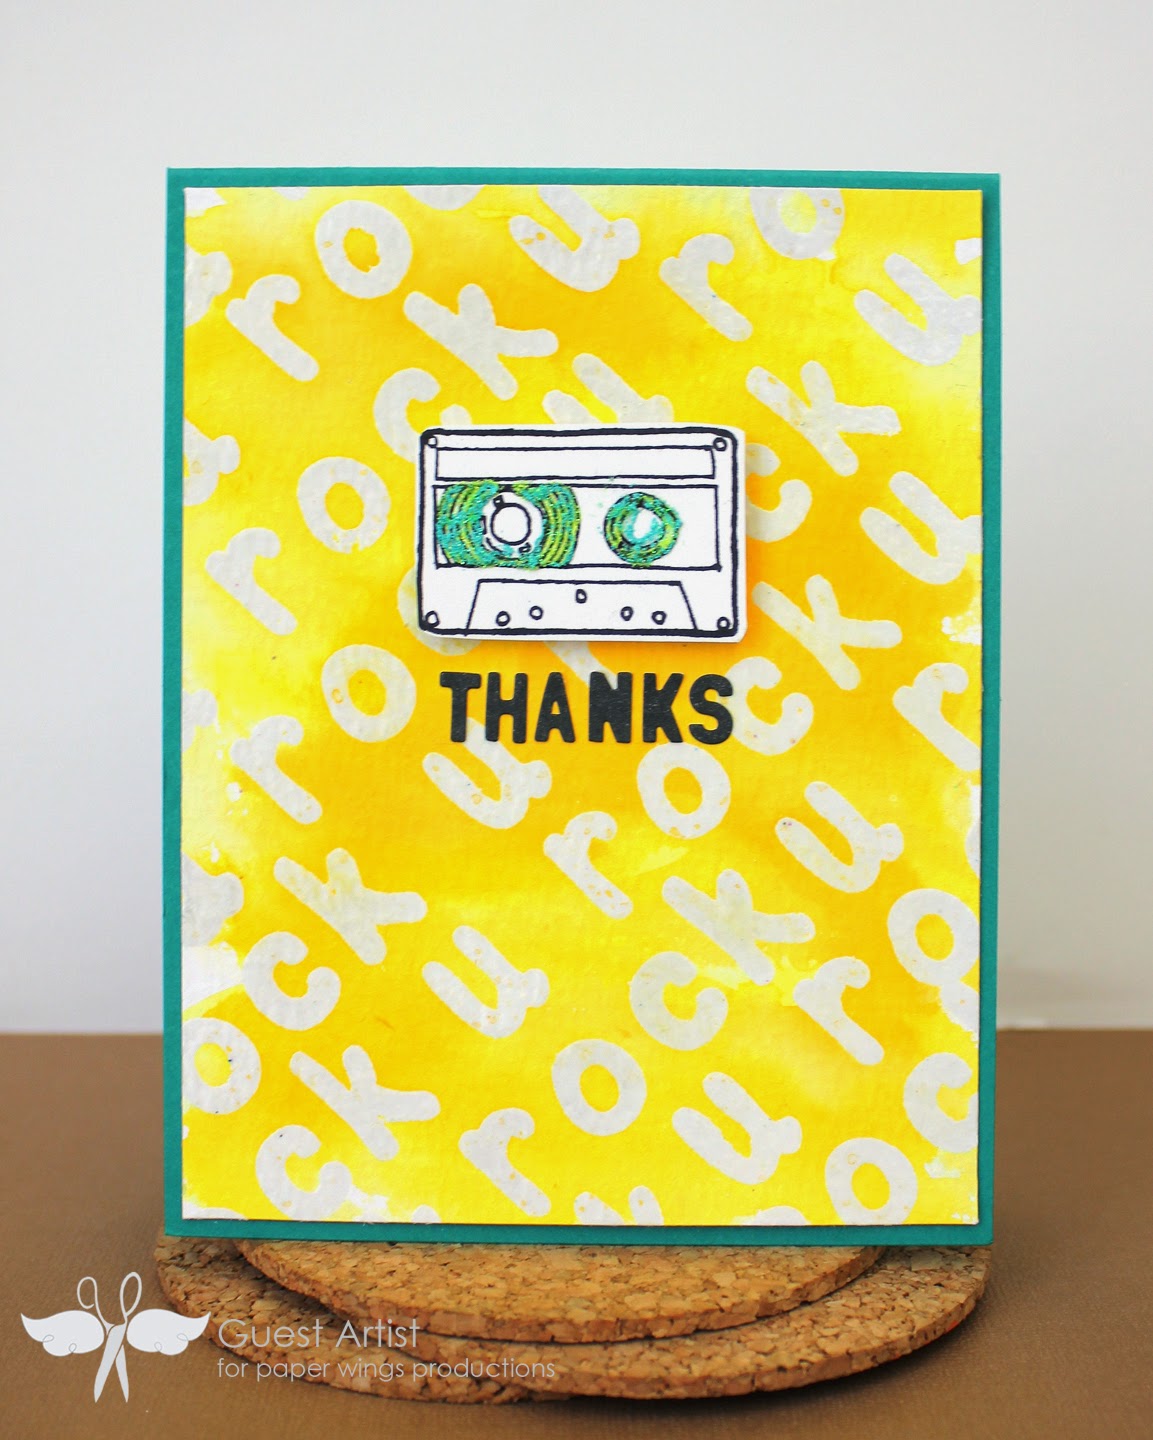
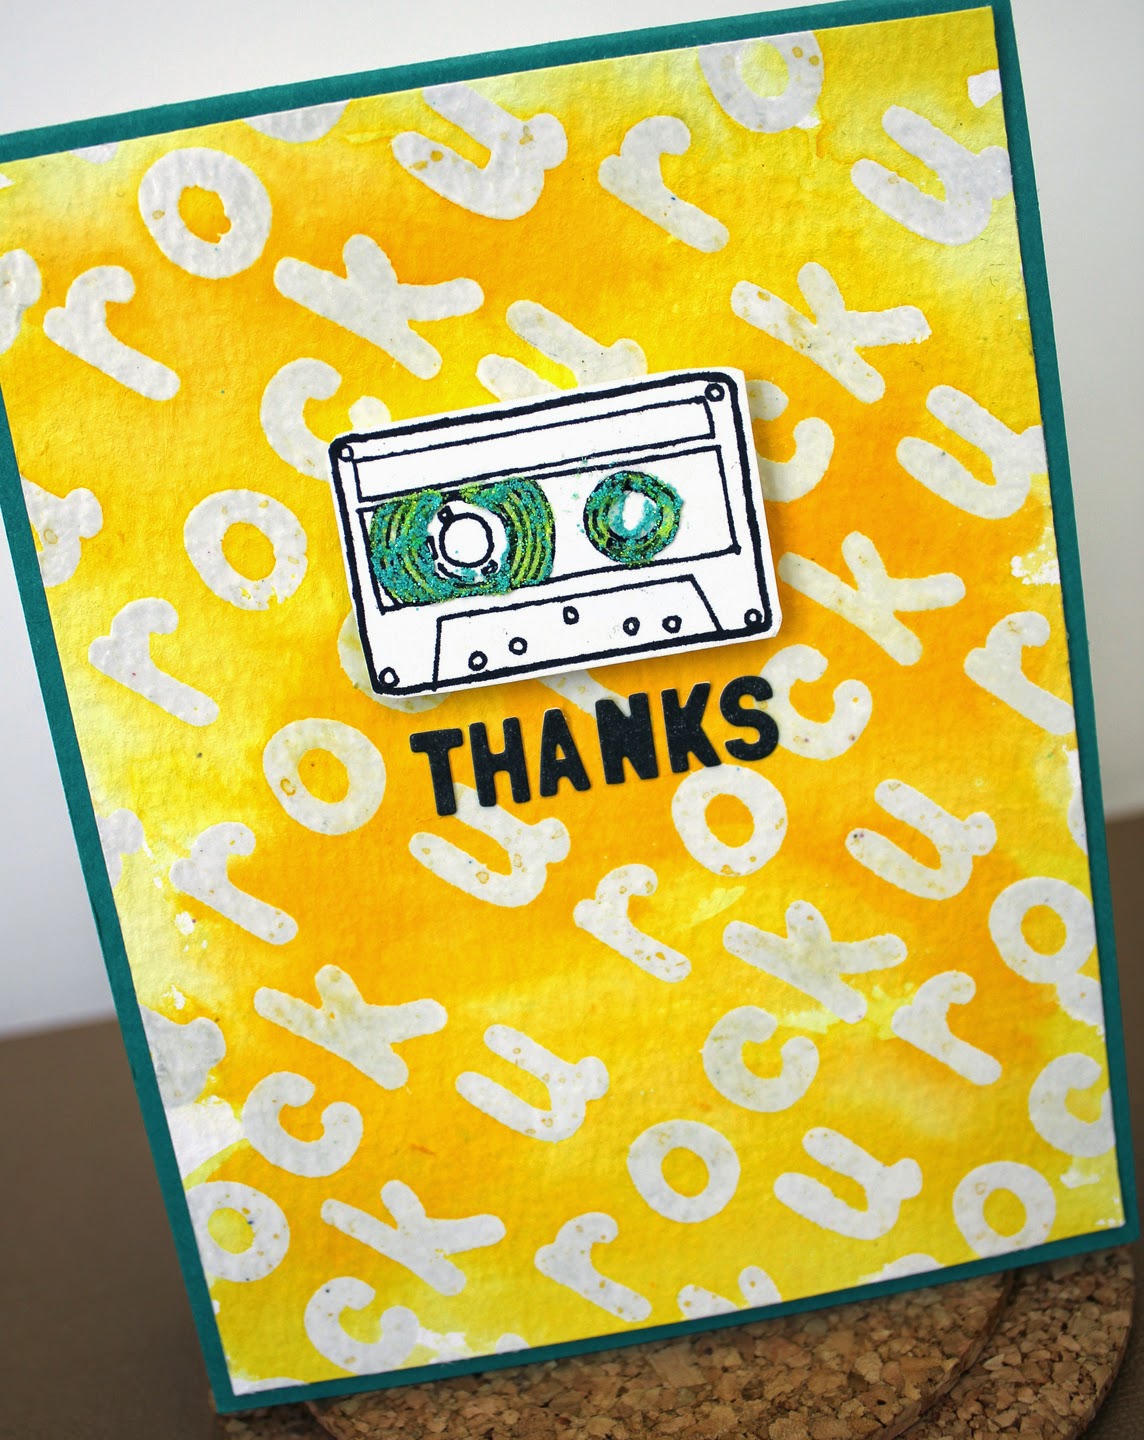
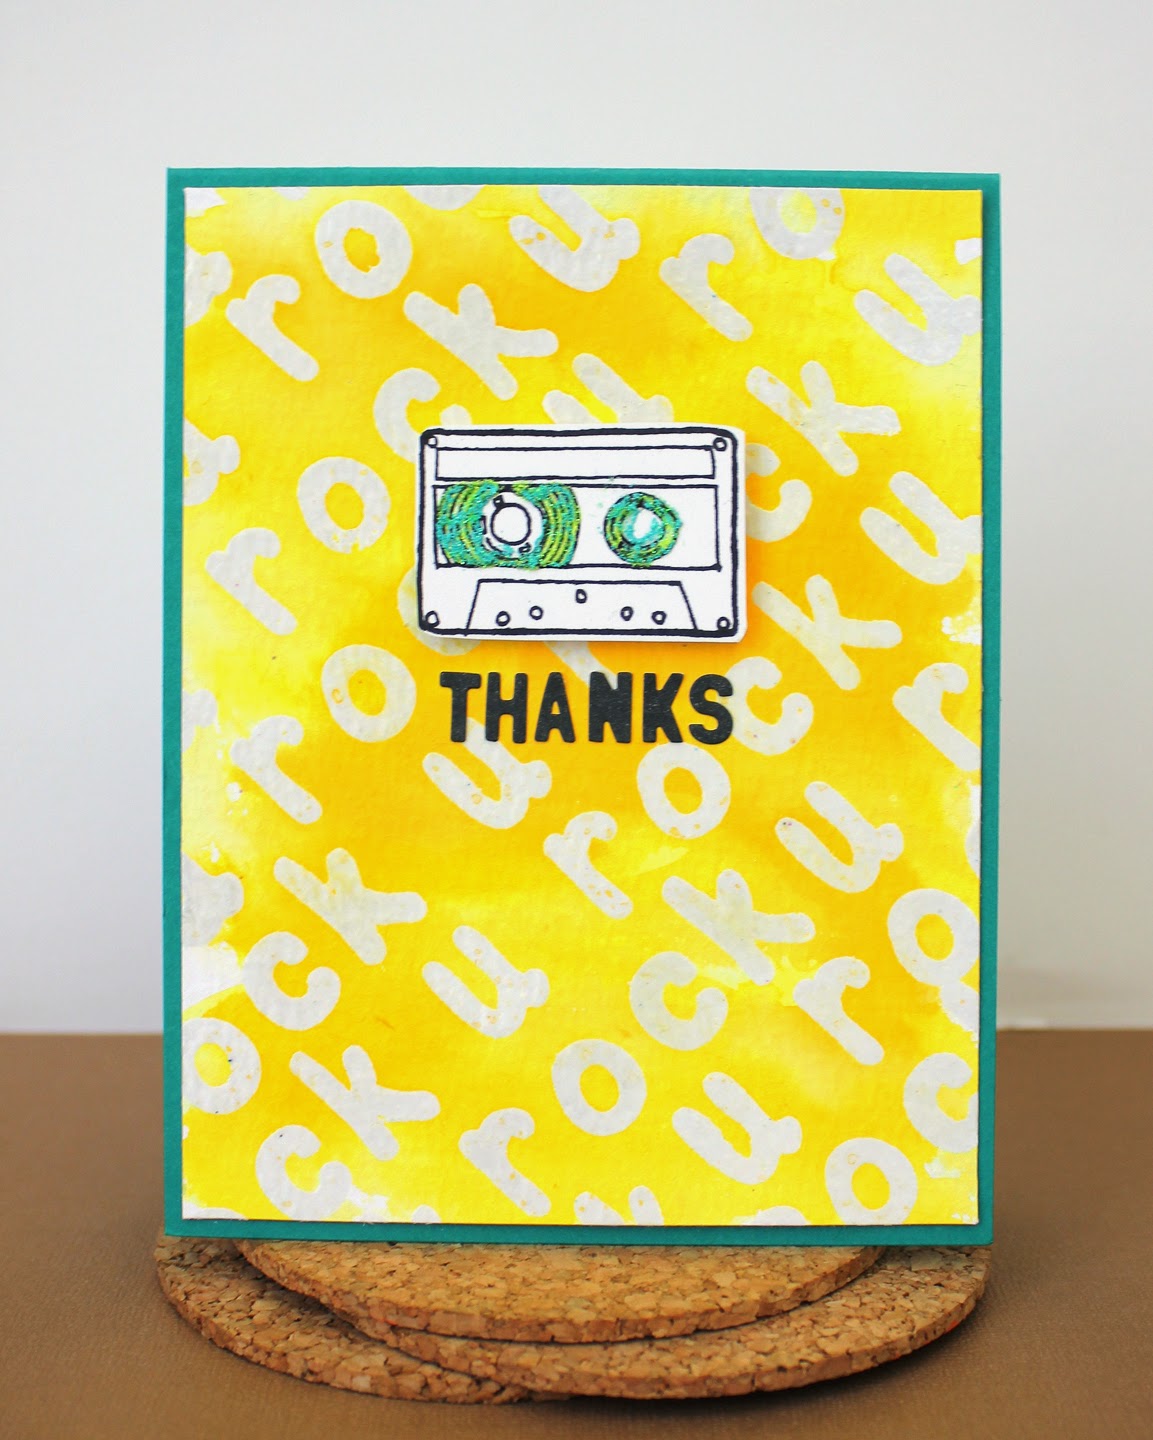
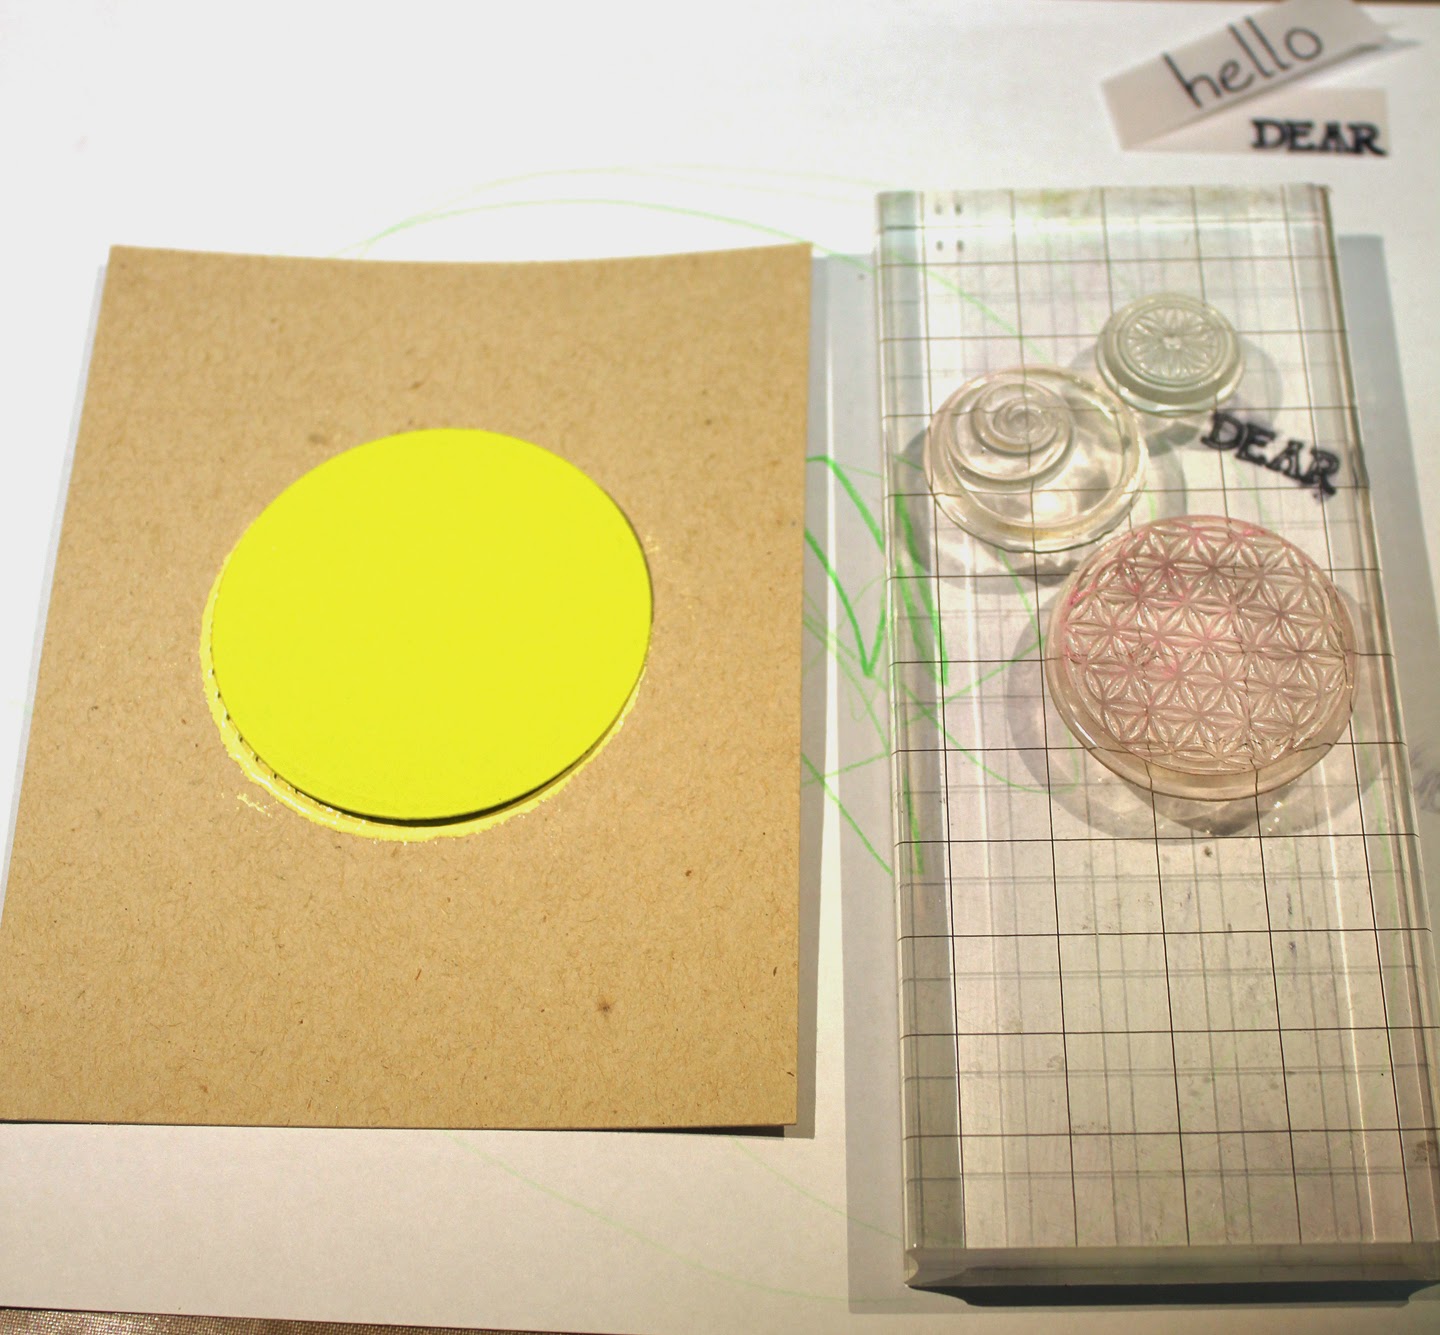
Here is the card I created using the emboss-resist technique:


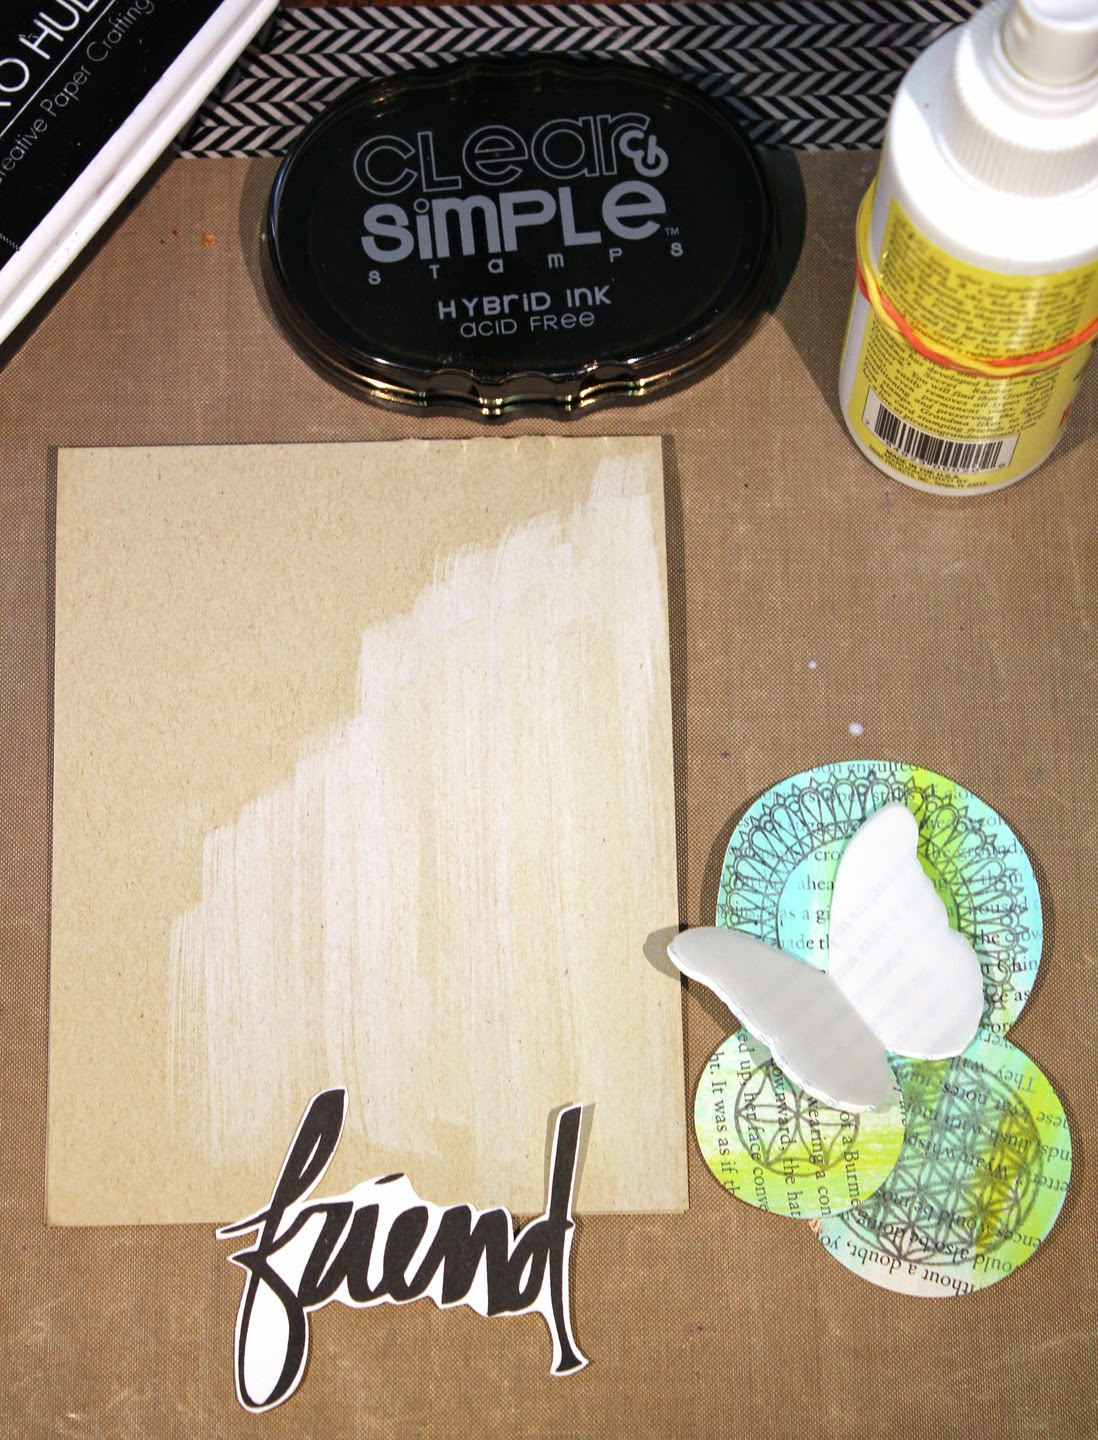
First off I have a pack of 8x10 water-colour paper that I decided was much more handy when cut to an A2 size. So I cut up that entire pack! It's so nice to have my water-colour paper just sitting there waiting for me. No prep required when I want to whip up a watercolored card. Gotta love that!

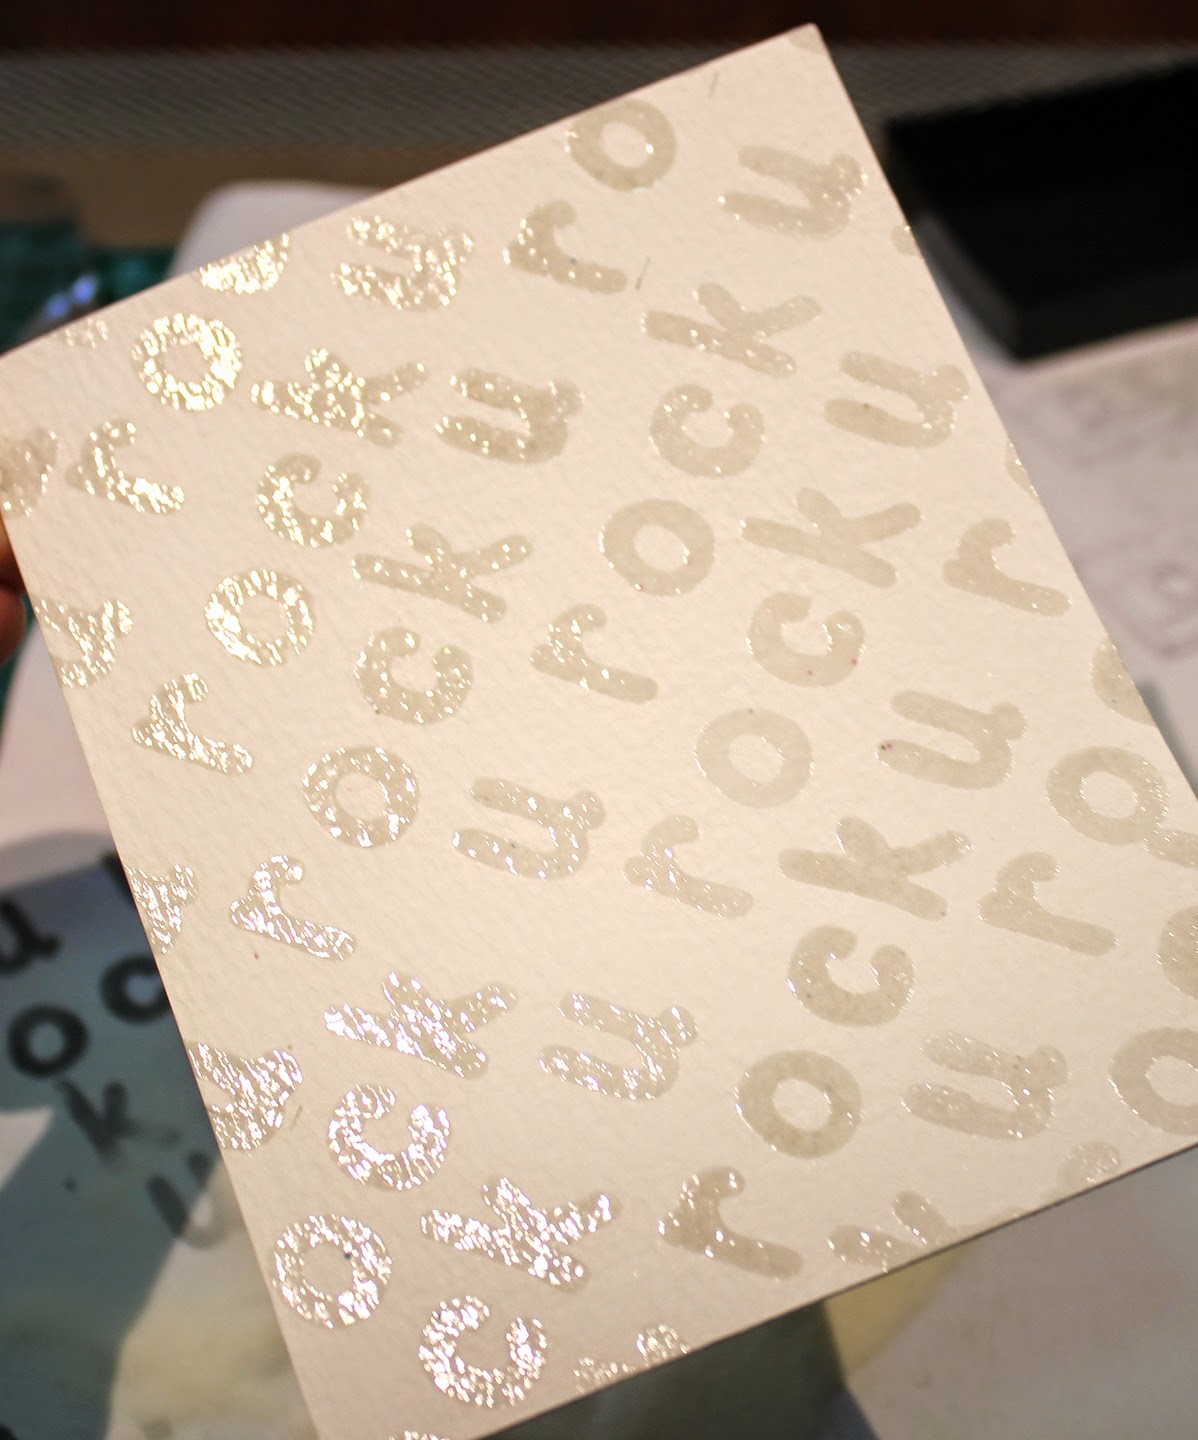
I used the Paper Wings Productions Solid Whimsical Alpha Stamps set and spelled out "U Rock" and heat embossed it as my background.

I just picked up some Peerless watercolors recently and WoW-ie!  These babies are vibrant and so amazing to use! I have tried all of the water-colour options out there (my to my check books demise!) and I deem these my absolute favourite. I find them the easiest to use. I started with a yellow wash and added in some orange to deepen the colour in certain areas.

I originally trimmed out 3 cassette tapes from Paper Wings fun set "Vintage Technology" (I love this set!) but I only ended up using one since three just covered up my background more than I wanted. I glued on some yellow neon glitter (Martha Stewart) and waited for it to dry. I then added a second layer of Teal Neon glitter, scrapping some off to reveal the yellow beneath it. I just wanted a pop of colour to help bring some balance.


I finished off my card by popping up my cassette with dimensional tape and adding a sentiment with some alpha stickers. I like my subliminal sentiment of "U Rock" to counterbalance the cassette tape and overt sentiment. (Remember when that was a big thing?  Kids were always talking about subliminal messages in songs. Maybe they still are, I would have to listen to pop music to know! I thought this turned out to be a funny take on that (but really, I just thought of it now. How's that for subliminal!). But I like the connection...

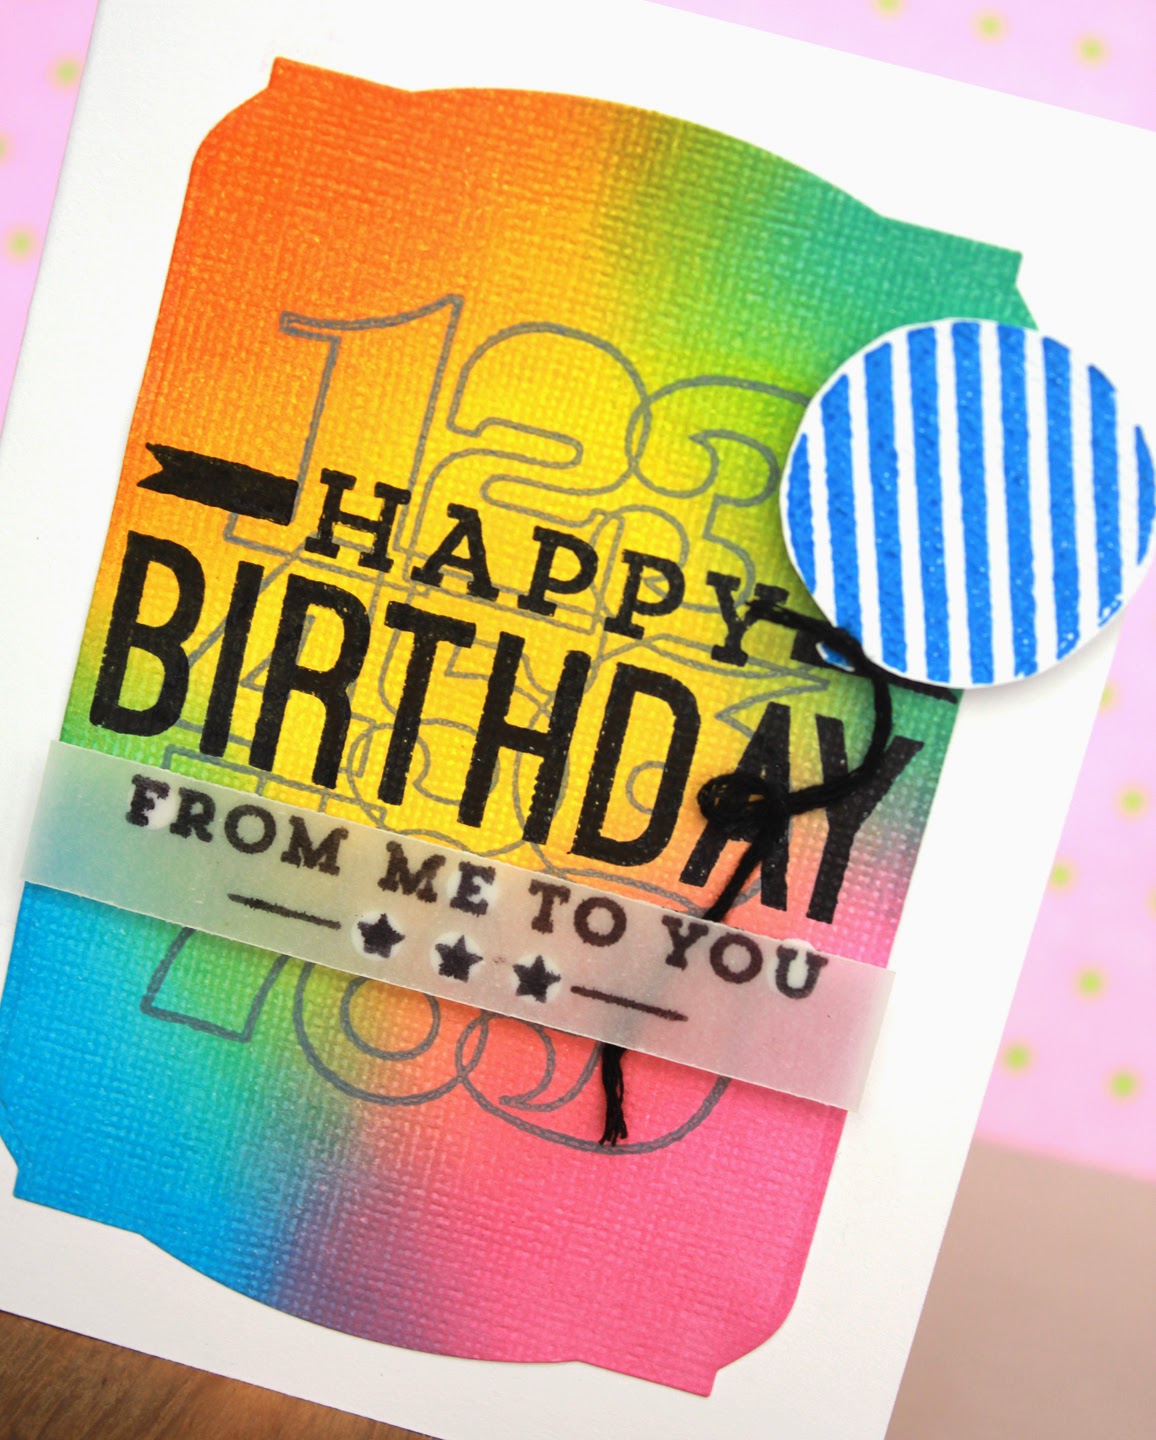
And here's the full card again for your viewing pleasure! Be sure to hop on to the next lovely designer to check out all the inspiration. And be sure to join us over at Paper Wings Productions Blog for a chance to win some crafting goods! Be sure to read all the details, they are making it purdy easy to increase your chances of winning.

 Thanks so much for stopping in. Have a good blog-hoppin' 'ol time!
k


Jul 3, 2014

Paper Wings Production Monthly Challenge: Embossing!

Hey there everyone! Today I'm joining Paper Wings Productions for their monthly challenge. I'm excited to be starting on their Design Team. Yay!!! You can check the announcement out HERE. 

This month they are teaming up with Creative Embellishments so you can play more than once and increase your chances of winning some prizes! We we all know is awesome! Head on over to both blogs and check it out.  

My card today uses Paper Wings Productions Sacred Geometry set to create both my background and the centre embossed emblem. 

I started by creating a circle mask using a circle die cut. I temporarily adhered it to my kraft card stock and smoooshed my VersaMark ink pad into the exposed circle. I then covered it with embossing powder.


I embossed one layer and then repeated the process (mask and ink) 4 more times until it was nice and thick.

The final time right as the last bits of powder melted, I pressed my stamps right into the hot powder, leaving the image imbedded into the powder. It looks like the old wax seal they used to stamp on letters. (way way back when ;)

I then decided (a bit too late) that it was too plain for my liking so I used the positive space of the circle to create a mask for my emblem to cover it and stamp a background. If you want to try this technique yourself, I suggest you stamp your background first. It's much easier that way (as you probably know ; )
Another tip for you is be sure to layout your stamps all together on one block. This stamps out much faster and you are much more apt to like the layout of it since it's much less "random" then it may seem.


I then took my embossed panel and trimmed it, rounded the corners and added it to my card base. I used some die cuts to create my sentiment banner and ran it through my sewing machine. I cut two banners. One from white card stock for the bottom and one from vellum for the top and shifted them slightly from each other, creating a drop-shadow effect. I added an enamel dot for the middle of the "o" and circle.


And there you have it! My first finished card for Paper Wings Productions! Please hop over and join in on our challenge for some fun, and be sure to join us this friday (July 4!) for our monthly blog hop and prize giveaway!


Thanks so much for stopping by! Love to you and yours,
k


 photo copyright.jpg
envye template.